Showing posts with label go-to meal. Show all posts

Monday, April 2, 2012

Southwest Stuffed Peppers

I am a huge fan of stuffed peppers. I love bell peppers, and get to eat them with some cheese and salsa? SOLD. 

I came across this recipe in Real Simple -- and that it was. We took an extra step of grinding the meat ourselves (but I'm ridiculous and you don't need to do that). We opted for sirloin versus ground chuck, brown rice instead of white rice, and did straight Greek yogurt (and didn't thin it out with water). Delish.

Cooking the meat and rice
Fresh out of the oven!


So colorful!
We had lots of leftovers by making four peppers. Paul thought it could have been a little spicier, but I liked it as it was. We buy medium salsa, so that on top helped add a little heat to the dish. You could mix up the ingredients inside the peppers -- black beans instead of ground meat, Spanish rice instead of brown or white, jalepenos instead of green chiles, or chihuahua cheese on top -- the possibilities are endless!

Enjoy!

Tuesday, March 27, 2012

Turkey Burgers and Sweet Potato Fries

Probably more fries than one should have, but oh well.

Last week, I totally picked out a meal I have been craving: turkey burgers and sweet potato fries. Maybe it's because it's been warm outside, but I am itching for some summer foods. Turkey burgers on the grill it is. 

I looked for pretzel rolls, as they are my absolutely fave, but they were out at the grocery store. We substituted some onion rolls (toasted, clearly) and topped the turkey burgers with some avocado and a little chipotle mayo. Even after a snafu with the grill (running out of propane), they were just what I was looking for! 

I have been wanting to try these sweet potato fries for a while. I don't mind making something similar on my own (i.e. peeling and cutting a sweet potato and roasting it in the oven), but I never could seem to get the crispiness right.  I picked them up at the store, and am totally hooked. We got the chipotle spiced ones, which are crispy, delicious and spicy! And at 4 grams of fat per serving (and no trans fats) they aren't the worst thing in the world for you. 

Now that we're back in business with a fresh propane tank, let's get ready for some summer grilling!
 

P.S. AND they have sweet potato tater tots! i think my life is complete.

Thursday, March 15, 2012

Linguine with Shrimp Scampi

I stole this photo from Food Network, as I forgot to take my own. My dishware isn't this rustic, nor my nails that nice. 
Ina Garten's Linguine with Shrimp Scampi is one of my easy go-to recipes for a speedy, tasty dinner. I try to keep frozen, raw shrimp on hand for situations like this. As noted on the most recent season of Top Chef (aka "Shrimpgate"), chefs say to avoid pre-cooked shrimp. It's easy to overcook and become chewy. I usually buy raw, deveined, easy-peel shrimp. Raw shrimp cook quickly (about 5 minutes in this recipe), and for those of us who are not good at planning ahead, you can defrost frozen shrimp easily by immersing them in some cool water for about 20 minutes. You do need to then peel them, but it's pretty quick and easy to do once defrosted.

I go off of Ina's recipe, but usually don't follow it exactly. I tend to use only about 1 tablespoon of butter and 1 to 1 1/2 of olive oil when making the sauce. I usually zest the lemon, and squeeze in lemon juice, but don't always use lemon slices. And I almost always forget about parsley (unless I luck out and it's laying around the house). All of those ingredients (more butter and olive oil, including the lemon slices or parsley, etc.) do add a stronger flavor -- but I think it's pretty tasty even without them!

It is fast to whip up with ingredients you have in the house already, and makes for a tasty and fresh dinner. Pasta is always a fave of mine (and Paul's), and doing something different than a marinara sauce kind of mixes it up a bit. Some lemony pasta with a green salad works well in the summer -- or during this warm spell we're having in spring! Enjoy!

Friday, February 17, 2012

Spanish Panzanella Salad


Last week, we made a fun Spanish panzanella salad from Wholesome Kitchen. The salad was SUPER easy to make, and really tasty! I really like warm or slightly warm salads in the winter -- they just add something a little seasonal. 

Instead of regular chorizo, I picked up some chicken sausage chorizo. We didn't lose any flavor, and definitely cut down on the fat content and (possible) oiliness of the salad. I also used regular paprika instead of Spanish smoked sweet paprika (not for lack of trying -- I couldn't find any at the store). That may have changed the flavor slightly, but I imagine it was not noticeable. The spinach wilts a little with the heat of the other ingredients and the warmed oil from the pan.

A great change-up from a traditional Italian panzanella salad -- we'll definitely make this again!

Tuesday, January 31, 2012

Winter Vegetables and Bulgur

I love roasted vegetables. They are probably one of my favorite (and easiest) things to cook, especially during the cold winter months. I found this recipe, and was immediately excited about making it for two reasons: A) I had never used bulgur before and B) this would use up many of the tasty vegetables in my produce basket. 

We used a turnip, a squash, carrots and parsnips. I chose to roast the vegetables (in the oven), instead of sautéing them -- so our cook time was a little longer than the recipe suggests.

My angle was a little off on this one. Sorry for the peek of Valentine's Day towel.
I sautéd the onion and added some minced garlic, before combining the roasted vegetables. I also used 1/2 cup of white wine and 3 cups of vegetable stock (instead of 4 cups of stock). 

With the spinach leaves mixed in at the end.

Apparently, I am showcasing all my seasonal towels today.
It was quite tasty! I would definitely recommend making this, especially if you have vegetables to saute or roast that would work well together. It made a big amount as well, so we had leftovers for lunches later that week.

Enjoy!

Friday, October 14, 2011

Lemon-Tarragon Halibut En Papillote

I pulled this recipe out of one of my magazines ages ago, and have been waiting to try it. It looked so easy and delicious that I couldn't wait to give it a try. I had been keeping my eye out at Dominick's for halibut, but the sign kept reading, "Coming soon!" We finally found some halibut at the fish market, and seized up on the opportunity. 

Preheat oven to 425 degrees. Soften 1 1/2 tablespoons of butter (I usually nuke it in the microwave in 10 second increments until it's the right consistency). Cut parchment paper into four 18-inch-long pieces.
I have no idea if this was 18 inches or not, but it worked.
Fold each piece in half, and cut into a half heart shape, using the fold as the heart's center.

Awwwwwww. Special.
Prep fennel (1 cup, julienned), 3/4 cup snow peas (cut diagonally into thirds) and carrots (1/2 cup -- they ask for shredded, but I did peeled, and it worked out fine). Place fennel, snow peas, and carrots in a bowl with 1/4 cup water and microwave on high for 4 minutes. Drain the vegetables once they are cooked through. 

Fennel and halibut go really well together.
While the vegetables are cooking, slice 1 lemon in half crosswise. Cut one half into 8 thin slices, then juice the remaining half. Combine 1 tablespoon lemon juice, 1 1/2 tablespoons of butter, and 2 teaspoons of finely chopped fresh tarragon.

We had bought one big halibut fillet, so we cut it into four (somewhat) evenly sized pieces.
In case you were wondering, yes, our bamboo cutting board still smells like fish.

Add 1/4 of the vegetable mixture to each of the parchment pieces, placing it along the fold.
Not s good with the lighting here, but you get the picture.
Place fillets on top of vegetables and add salt and pepper. Divide butter mixture among each serving, dotting over tops of fish. Top each fillet with 2 lemon slices.
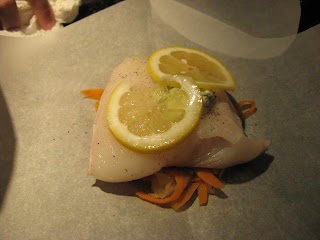
Yum. Looks tasty!
The directions say: starting at the top of each heart, fold the edges of parchment in, tucking the edges as you go. Twist the end tip to secure tightly. I don't know what the heck I did, but I managed to close them up. I think the most important part is that the parchment is closed so that the fish and veggies can steam.

Place packets on baking sheet. Bake for 12 minutes or until the parchment puffs up. I think we kept them in a few minutes longer, since some of the fillets were more thick than others.

Hello, buttery, lemony goodness.
DELICIOUS. And so easy to make. If you're willing to the extra legwork with the parchment paper (and really, it's not that much work) -- I think the fish come out great. You don't have to worry about the fish drying out since it is steaming in the parchment packet. Paul and I both had leftovers for lunch at work the following day -- nuked them in the packet in the microwave at work, and they STILL were moist and tasty.  

I am totally going to do this again.  Maybe with a different whitefish or salmon, and a corresponding veggie combo? I imagine you could do sliced bell peppers, spinach, kale, maybe even potatoes if you sliced them really thin. Enjoy!

Friday, September 9, 2011

June 25 (and about 10 times since then, so it's sort of current): Homemade Pizza

We love pizza. It's true. I think Paul and I could eat a different type of pizza every night of the week. We started making our own at home a while back, using pre-made pizza bread from the grocery store. After delving into our fave cookbook, How to Cook Everything Vegetarian, we started making our own dough. It is SUPER easy to make, as long as you have instant yeast lying around (which we now do all the time for this purpose).

We make the dough in the food processor, but you can also make it by hand or in your stand mixer. Combine 3 cups of flour, the yeast (I use the whole package of instant yeast -- it's a little more than 2 teaspoons, but whatever) and salt (I use about a teaspoon -- half of what Bittman suggests) in the food processor.

Adding the water. Action shot!
Turn on the machine, and add in 1 cup of water and 2 tablespoons of olive oil. Process for about 30 more seconds, adding additional water 1 tablespoon at a time until the dough becomes a sticky ball. You'll know it's ready because it starts lurching around your food processor. 

Take the dough out of the food processor, and knead it just a few times on a floured surface. Put the dough in a bowl, adding the last tablespoon of olive oil to coat the dough. 

Resting comfortably, waiting for it's moment in the spotlight.
Cover the bowl with plastic wrap, and let it rise for 1 - 2 hours. (Note: You definitely don't have to wait that long -- our hunger has gotten the best of us, and we've let it rise for only 30 minutes and it's been fine.)


After the dough has rested, separate it into two balls of dough. Sprinkle with a little flour, and cover with a towel or plastic wrap. Let those rest for about 20 minutes.


We preheated the oven at this point -- they suggest 500 degrees or higher. We found that 500 degrees was best, especially when you have sensitive smoke detectors to contend with. After frantic running around (a necessary step for solving any loud, beeping problem), this issue is solved by either opening a window when it's cool out, or turning on the overhead fan on the stove ahead of time. Fair warning, people.

While the dough was doing it's thang -- we started prepping the other ingredients. We decided to do a simple margherita pizza, with fresh tomatoes, basil and mozzarella di bufala.

I thought about the mandoline slicer for this, but thought the tomatoes and cheese would get smushed.

We use a baking sheet to cook the pizza dough, so they suggest oiling the sheet (we used a little more olive oil) and actually spreading out the dough on the sheet rather than rolling it out on a floured surface and trying to transfer it. 

Sprinkle the dough with a little more salt and olive oil and start adding your toppings. We started with some store bought pizza sauce, but you could certainly use your own (or do our other fave - a white pizza! See the bottom of the page for that).

Paul hard at work.

Here is the pizza, topped with sliced tomatoes, fresh basil, some grated mozzarella cheese underneath and larger pieces of mozzarella di bufala on top. 
 
Slightly misshapen, but still looking good!
Into the oven she goes, cooking for about 10 minutes. I started checking it around 8 minutes just to be sure we weren't burning the crust. 

To confirm that it was done, we checked underneath to be sure it is nice and browned. Dunzo. LET'S EAT.


And for the big reveal...


Delicious!
The pizza turned out awesome. The crust is crispy, but not overdone. The dough has a unique taste to it, that reminds Paul a little of Gino's East crust with it's cornmeal-ey flavor. It's simple to make, and there are so many different toppings you can use. 

We've since made pizza several times, with a variety of toppings. Sometimes we scrap together what we have in the house and it ends up being pretty good (better than some sort of frozen meal -- that's for sure). Some ideas for your homemade pizza adventures:

  • The aforementioned white pizza: thinly sliced red potatoes (using the mandoline is best, in my opinion), fresh or dried rosemary and mozzarella and Parmesan cheeses. IT IS SO GOOD. Try it. Try it now. 
  • Red onion, tomato and basil -- topped with Romano (we didn't have mozzarella in house). Definitely a more tangy cheese, but quite good. You don't need as much cheese because of the strong flavor, but it was tasty.
  • Paul has made pepperoni, red onion and cheese pizza with this dough, and absolutely loved it. He used a pepperoni sausage (versus buying pre-sliced pepperoni or those pepperoni slices in a bag) and sliced it himself. He said it was really good -- not the greasy stuff you typically think of when you eat pepperoni pizza.
Happy pizza making!

Thursday, August 25, 2011

June 23: Cornflake-Crusted Chicken Fingers

There are some days when I just don't feel like cooking anything adventurous. I know. Surprising. It is then that I turn to these quick and easy chicken fingers. I found this recipe several years ago in Fitness Magazine, and have probably made them 10 times. Probably not the most exciting recipe to follow, but it is quick, easy and better for you than regular chicken fingers.

Yes, Corn Flakes, I endorse you for this recipe. 
Basic Ingredients:
12 oz. skinless, boneless chicken-breast halves
1 egg, slightly beaten
1 tbsp honey
1 tsp mustard
2 cups cornflakes, finely crushed (I pour them in a Ziploc bag and crush with a rolling pin)
black pepper to taste


Preheat the oven to 450 degrees. Cut chicken breasts into strips. Combine egg, honey, and mustard in one dish.


Honey mustard goodness. 
In another dish, stir together cornflake crumbs and pepper. Dip chicken strips into egg mixture, then roll in crumb mixture. Spread the chicken strips on a baking sheet.


No boot-shaped McNugget, but there are a couple fun shapes in there. 
Bake for 12 minutes or until chicken is no longer pink.


Crunchy goodness. 
The chicken strips are nice and crispy without all the extra fat from regular bread crumbs or from frying. They are delicious with many different sauces -- buffalo sauce, BBQ sauce, ranch, mustard, ketchup -- or all of them.


The butter and sour cream were for baked potatoes. But I bet they'd go good with these chicken fingers too. 

Wednesday, May 25, 2011

May 1: Grilled Chicken with Pesto-Yogurt Potato Salad and Beet Green Salad

We had our friends Kyla, Alex and Roxy over for dinner, and decided to make some grilled chicken, with a beet green salad and pesto-yogurt potato salad as our sides. I wanted to highlight this potato salad because 1) it tastes good 2) it's easy to make and 3) it has no mayonnaise, so it's a good recipe to bring to an outdoor barbeque.

You begin by quartering red potatoes. I cut up a 3 pound bag of potatoes to make this batch, which was more than enough for dinner for four (and a half), as well as two nights of leftovers for us two.

Lots of mysterious shadows in this photo.
Boil the potatoes until they are fork-tender. Strain them out of the boiling water, and then put them into a large bowl.

While the potatoes were cooking, I made the pesto. You can certainly use the jarred/pre-made stuff if that is easier. I made our pesto from what we had in the house -- leaves and stems from our basil plant, some pine nuts, minced garlic, olive oil and Parmesan cheese.

Once your pesto is ready, combine it with the warm red potatoes and 1 1/2 cups of Greek yogurt.

Here is the final product...

You can serve this room-temperature, cold or hot. It's good regardless.
Here is the salad alongside the beet green salad and the grilled chicken.


And here it is the next evening alongside grilled salmon and zucchini halves. 


This time around, I think we could have added more pesto, but to be honest -- I am not sure if we added as much as the 1/2 cup as suggested by the recipe. The Greek yogurt is nice and tart and really adds a different dimension to the potato salad. Depending on the Greek yogurt you buy (or it could be all Greek yogurt -- I am not completely sure), this is a gluten-free recipe as well for all our friends with celiac.