The object of my dreams for the last few nights:
I added capers, but you get the picture. The deliciousness was had at Russ & Daughters. Birthday gifts can now be sent in the form of Scottish salmon.
Tuesday, October 25, 2011
Sunday, October 16, 2011
Foodies on the Road!
![]() |
On one of our many road trips. I think this is some sort of Last of the Mohicans reference. |
Friday, October 14, 2011
Lemon-Tarragon Halibut En Papillote
I pulled this recipe out of one of my magazines ages ago, and have been waiting to try it. It looked so easy and delicious that I couldn't wait to give it a try. I had been keeping my eye out at Dominick's for halibut, but the sign kept reading, "Coming soon!" We finally found some halibut at the fish market, and seized up on the opportunity.
We had bought one big halibut fillet, so we cut it into four (somewhat) evenly sized pieces.
DELICIOUS. And so easy to make. If you're willing to the extra legwork with the parchment paper (and really, it's not that much work) -- I think the fish come out great. You don't have to worry about the fish drying out since it is steaming in the parchment packet. Paul and I both had leftovers for lunch at work the following day -- nuked them in the packet in the microwave at work, and they STILL were moist and tasty.
I am totally going to do this again. Maybe with a different whitefish or salmon, and a corresponding veggie combo? I imagine you could do sliced bell peppers, spinach, kale, maybe even potatoes if you sliced them really thin. Enjoy!
Preheat oven to 425 degrees. Soften 1 1/2 tablespoons of butter (I usually nuke it in the microwave in 10 second increments until it's the right consistency). Cut parchment paper into four 18-inch-long
pieces.
I have no idea if this was 18 inches or not, but it worked. |
Fold each piece in half, and cut into a half heart shape, using the fold as the heart's center.
![]() |
Awwwwwww. Special. |
Prep fennel (1 cup, julienned), 3/4 cup snow peas (cut diagonally into thirds) and carrots (1/2 cup -- they ask for shredded, but I did peeled, and it worked out fine). Place fennel, snow peas, and carrots in a bowl with 1/4 cup water and microwave on high for 4 minutes. Drain the vegetables once they are cooked through.
Fennel and halibut go really well together. |
While the vegetables are cooking, slice 1 lemon in half crosswise. Cut one half into 8 thin
slices, then juice the remaining half. Combine 1 tablespoon lemon juice,
1 1/2 tablespoons of butter, and 2 teaspoons of finely chopped fresh tarragon.
We had bought one big halibut fillet, so we cut it into four (somewhat) evenly sized pieces.
In case you were wondering, yes, our bamboo cutting board still smells like fish. |
Add 1/4 of the vegetable mixture to each of the parchment pieces, placing it along the fold.
Not s good with the lighting here, but you get the picture. |
Place fillets on top of vegetables and add salt and pepper. Divide butter mixture among each serving, dotting over tops of fish. Top each fillet with 2 lemon slices.
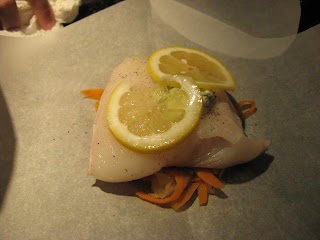
Yum. Looks tasty! |
The directions say: starting at the top of each heart, fold the edges of parchment in,
tucking the edges as you go. Twist the end tip to secure tightly. I don't know what the heck I did, but I managed to close them up. I think the most important part is that the parchment is closed so that the fish and veggies can steam.
Place
packets on baking sheet. Bake for 12 minutes or until the parchment puffs up. I think we kept them in a few minutes longer, since some of the fillets were more thick than others.
Hello, buttery, lemony goodness. |
I am totally going to do this again. Maybe with a different whitefish or salmon, and a corresponding veggie combo? I imagine you could do sliced bell peppers, spinach, kale, maybe even potatoes if you sliced them really thin. Enjoy!
Friday, October 7, 2011
Lentil Hunt 2011: The Quest to make Lentil Fritter Pitas
Lentil fritters. Hmmmm. They sounded a little weird, but we're brave so we thought we'd give them a try. Man, are we glad that we did. SPOILER ALERT: they are delicious.
The recipe is simple enough. You use your food processor to make the lentil patties, fry them up, make a slaw of red cabbage and a sour cream based topping to go with it. Our only hitch came in preparing to make the recipe. I, for the life of me, could not find canned lentils. I walked around. I asked people. I looked quizzically at the shelves. I checked two different grocery stores, both of which did not have canned OR dried lentils (hence the post title). Finally, at the third store, I found them. Yeesh. Thank goodness the rest of the recipe was easy.
Anyways, back to the cooking part. In a food processor, puree 1 can of the lentils with the cilantro, parsley, garlic, and cumin until nearly smooth. We didn't have fresh cilantro, so I used some cilantro paste (which is handy in a pinch) in it's place.
Take the lentil mixture and form them into sixteen 1/2 inch thick patties. Heat 1 tablespoon of the remaining oil over medium-high heat. Cook the patties for 3 to 4 minutes per side. You can using the remaining tablespoon of oil if you make them in two batches (which I did).
We went for the pocket pitas (you could do pocket-less and eat it more like a gyro). We put two patties in each and added the toppings.
I was pretty impressed with how this turned out. I absolutely love falafel sandwiches, and can't get enough of them. This tastes pretty darn close to falafel, and I feel a little better that it isn't deep fried.
I will say that it is a little messy if the pita doesn't hold up with all those ingredients. Maybe that's why they suggested pocket-less -- so that the pita bread a little thicker. Either way, Paul and I both really liked them, and they are making their way onto our regular dinner rotation.
Well, once I find more lentils.
The recipe is simple enough. You use your food processor to make the lentil patties, fry them up, make a slaw of red cabbage and a sour cream based topping to go with it. Our only hitch came in preparing to make the recipe. I, for the life of me, could not find canned lentils. I walked around. I asked people. I looked quizzically at the shelves. I checked two different grocery stores, both of which did not have canned OR dried lentils (hence the post title). Finally, at the third store, I found them. Yeesh. Thank goodness the rest of the recipe was easy.
Anyways, back to the cooking part. In a food processor, puree 1 can of the lentils with the cilantro, parsley, garlic, and cumin until nearly smooth. We didn't have fresh cilantro, so I used some cilantro paste (which is handy in a pinch) in it's place.
I realize the paste doesn't look very appetizing, but it definitely serves its purpose. |
Transfer
to a bowl and mix in the bread crumbs (we used panko),
the remaining can of lentils, salt, and pepper.
Pre-transformation. |
Mix together the cabbage with the lemon juice, 1 tablespoon of the oil, salt and black pepper.
Red cabbage, soaking in the lemon juice. |
In a different bowl, stir together the yogurt, crushed red pepper, and 1/4 cup water.This will thin out the sauce a little.
I'm a big fan of the Greek yogurt, and especially as a sour cream substitute. |
Take the lentil mixture and form them into sixteen 1/2 inch thick patties. Heat 1 tablespoon of the remaining oil over medium-high heat. Cook the patties for 3 to 4 minutes per side. You can using the remaining tablespoon of oil if you make them in two batches (which I did).
We had a few less than 16. I was a bit generous with the lentil patties. |
We stuffed each pita with the patties, cabbage mixture, yogurt sauce, and topped it with fresh parsley (substitute for cilantro).
That squash on the side looks a little sad. Let's go in for a close-up on the good stuff. |
YEAH. That's more like it. |
I will say that it is a little messy if the pita doesn't hold up with all those ingredients. Maybe that's why they suggested pocket-less -- so that the pita bread a little thicker. Either way, Paul and I both really liked them, and they are making their way onto our regular dinner rotation.
Well, once I find more lentils.
Sunday, October 2, 2011
Summer Squash with Baked Eggs
I really like weekend breakfast. I'm a coffee and granola bar on the go kind of girl during the week, so when I have the time to cook something yummy on the weekend to enjoy in the morning, I am all over it. We had some leftover grilled zucchini and yellow squash from earlier in the week, so I looked for a recipe to incorporate those items (that wasn't simply adding them to an omelet). I found this delicious looking one -- and decided to make it.
Start off by grating the squash and zucchini. Combine the grated vegetables with 1 tsp. of salt and let drain for 30 minutes.
While the vegetables are draining, preheat the oven to 375 degrees.
In an ovenproof skillet, heat 2 tbsp of olive oil over medium heat. Cook the shallots, garlic and paprika for just a couple minutes, until fragrant (I think it was about 2 minutes?). Squeeze as much liquid as possible out of the squash and zucchini, then add it to the pan. Add the tomatoes, and cook for about 10 minutes, stirring occasionally.
While everything is cooking up, prepare the goat cheese and chiffonade the basil. I cut up some sourdough bread we had in the house as well.
Once the skillet is ready, mix in the basil and goat cheese.
After mixing in the cheese and basil, make four small wells in the mixture. Pour a little olive oil in each well, and then crack an egg into the well. Top each egg with salt, pepper and a sprinkle of paprika.
Bake until egg whites are set, but yolks are still soft -- about 10 minutes. The eggs will continue to cook in the hot pan after you remove it from the oven, so if you like your eggs goopy, you'll need to make your move quickly to get it out of the pan (so that it won't continue to cook and harden up).
I used a flat plastic spatula to cut the mixture into servings. It was pretty easy to scoop out with the egg whites being set.
I thought that this turned out great. Although it seems a little counter intuitive to turn on the oven in the summer, this was worth it. Some of the reviewers for the recipe talk about cooking it completely on the stove, which is also an option if you don't want to fire up the oven in the summer.
The softness of the egg yolk and the creaminess of the goat cheese go really well together. The squash and zucchini make a nice crispy base. I'm interested in trying this with some other vegetables -- maybe using sweet potatoes as part of the base in addition or in replacement of either the squash or the zucchini.
Making use of that grater attachment on the food processor. |
Draining the liquid helps crisp up the vegetables and keep it from getting soggy. |
In an ovenproof skillet, heat 2 tbsp of olive oil over medium heat. Cook the shallots, garlic and paprika for just a couple minutes, until fragrant (I think it was about 2 minutes?). Squeeze as much liquid as possible out of the squash and zucchini, then add it to the pan. Add the tomatoes, and cook for about 10 minutes, stirring occasionally.
We used cherry tomatoes, but I'm sure you could use any tomatoes you have on hand. I like the way cherry tomatoes come out after being in the oven. |
The creaminess of chevre (the goat cheese) is awesome for breakfast. |
That may be more than 4 oz of goat cheese. Oh well. |
I used the recipe's suggested method of cracking the egg into a small bowl, and the pouring it into the well for three of the eggs. I'm sure you have no idea which one I did differently. |
Hot out of the oven and ready to go! |
Summery breakfast! |
The softness of the egg yolk and the creaminess of the goat cheese go really well together. The squash and zucchini make a nice crispy base. I'm interested in trying this with some other vegetables -- maybe using sweet potatoes as part of the base in addition or in replacement of either the squash or the zucchini.
Sunday, September 25, 2011
Addendum: Our post on pizza.
We made pizza again. Here is the infamous rosemary-potato pizza. So good.
Paul also made a tomato, pepperoni and basil pizza. We used some heirloom tomatoes we had received in our produce basket (they are yellow, so that's why the pizza looks different).
Yum. |
Pre-cheeseing and baking |
Monday, September 19, 2011
Tofu Pad Thai
Paul and I have been talking about making pad thai forever. We decided to just bite the bullet, and give it a whirl. We even upped the ante (during an eventful Saturday night out) by inviting two friends over to partake with us. I usually make it my rule not to invite people when we are trying something that is really new or challenging for us, just in case things go wrong. Apparently, a couple beers made us forget this informal rule.
After reading about 900 pad thai recipes online, I finally selected one from my boy, Mark Bittman. I had picked up the rice noodles, but could not find some of the ingredients I kept seeing in all the recipes -- tamarind paste in particular, and also bean sprouts. I did see some recipes without the tamarind paste, so I figured it would be okay.
The rice noodles are cooked differently than pasta noodles. Instead of boiling water, and cooking the pasta in the boiling water, you boil water and then pour it over the rice noodles (i.e. it does not need to be continuously boiling/cooking). The noodles soak until they are tender enough to eat, but not mushy. I think ours sat for about 15 minutes or so? I just kept tasting them until they were softened through. We then drained the noodles, and stirred in a bit on peanut oil to keep them from sticking to one another.
In a small saucepan, combine the fish sauce, (tamarind paste if you were able to find it) honey and rice vinegar. Heat over medium-low heat until it simmers. Add red pepper flakes, and set aside.
Since we weren't sure how the pad thai was going to turn out, I had a backup plan. Frozen P.F. Chang's Beef and Broccoli. I wasn't going to take the chance that we'd have nothing to eat at all, or that we'd run out of food.
We went the matchstick route for the tofu. Looking back, I probably would have cubed it for this recipe.
Put the remaining oil in a large skillet over medium-high heat. When the oil shimmers, add the scallions and garlic, and cook for a minute. Then add the eggs to the pan.
Add the cabbage (and bean sprouts, if you can find them) and continue to cook until the cabbage begins to wilt. Then add in the tofu.
Here's where it started to get dicey. I had a hard time keeping the tofu from becoming a giant crumbly pile as I mixed everything together. You are to cook the tofu until it begins to brown, but I had a hard time doing that. It was mixed in with the egg mixture and didn't appear to be changing color as it cooked.
Once it is browned, you add the drained noodles and the cooked sauce. For us (with our non-browning tofu) I chose to mix everything once I realized our friends had already had a bottle of wine, and it was getting late.
I tasted it here, and thought it was bland. Then I realized, I had cooked the entire package of rice noodles, and not the 4 oz suggested in the recipe (essentially double the noodles with only one batch of sauce). Oops. We opened up another bottle of wine and quickly made another batch of the sauce. That helped a LOT. I am not always so good with the ratios...or the reading of the recipes.
Serve the pad thai with lime wedges, chopped peanuts and cilantro.
The pad thai actually turned out pretty good. The flavors were pretty close to the pad thai you'd get at a restaurant. You got both sweet and sour flavors, and the cilantro, peanuts and lime really added a nice touch to it. I think having the correct noodles helped as well, vs. substituting some sort of pasta in place of the rice noodles. You could tell a little something was missing -- and I'm guessing it was that tamarind paste. I'll have to do a better job of hunting it down at the store, and we'll try it again!
Deep breath. You can do this. |
The rice noodles are cooked differently than pasta noodles. Instead of boiling water, and cooking the pasta in the boiling water, you boil water and then pour it over the rice noodles (i.e. it does not need to be continuously boiling/cooking). The noodles soak until they are tender enough to eat, but not mushy. I think ours sat for about 15 minutes or so? I just kept tasting them until they were softened through. We then drained the noodles, and stirred in a bit on peanut oil to keep them from sticking to one another.
Easy enough. |
Have we talked about how bad fish sauce smells? Yerg. I tried to reassure our guests that it would be okay (I hoped I wasn't lying). |
Plan B. |
The tofu continued to dry out on the cutting board. Wet tofu does not make for easy stir-frying. |
Once the eggs start to set, scramble them until they are just done. |
Here's where it started to get dicey. I had a hard time keeping the tofu from becoming a giant crumbly pile as I mixed everything together. You are to cook the tofu until it begins to brown, but I had a hard time doing that. It was mixed in with the egg mixture and didn't appear to be changing color as it cooked.
Once it is browned, you add the drained noodles and the cooked sauce. For us (with our non-browning tofu) I chose to mix everything once I realized our friends had already had a bottle of wine, and it was getting late.
Maybe they have had enough wine that they'll like this, even if it is missing tamarind paste. |
Serve the pad thai with lime wedges, chopped peanuts and cilantro.
Plans A AND B. They both made it on the plate. Woohoo! |
Subscribe to:
Posts (Atom)